Pages

Thursday, December 22, 2011

HDR Video on T3i - get the F outta here

Ok, I hope this is not like an April Fool's trick. But the way Magic Lantern has improved, I have a feeling it's going to be real.
This should be released today by the Magic Lantern folks. This teaser was shot with the T3i, but the Unified build will surely make it work for T2i and others too.

Magic Lantern HDR Video X-MAS teaser from Bart@RedKiteMedia on Vimeo.


Since my last post, I have since updated to the 11-11-11 Unified Build. Unified meaning, it is the same install package not just for T2i, but for T1i, T3i, 60D, and 50D. Yes, 50D does not shoot video, but from the wizards behind Magic Lantern, I'm pretty sure it will shoot video soon.

Major changes I like so far with the 11-11-11 build:
- Boot and install straight from the card as an update.
- Improved timelapse photo mode, 422jpeg files no longer there, quality was poor then
- Format the card in the camera without losing the Magic Lantern install

If you have not installed this free upgrade to your camera yet, go here:
Magic Lantern

Deal of the day - $5 Lowepro strap


Lowepro Speedster Strap for Five Dollars and free shipping.

Monday, December 12, 2011

Behind the scenes...err shoulder... of a wedding photographer

Want to know how to shoot a wedding? Or get tips on ring shots?

Jaroslav Repta made this great video documenting himself behind the scenes on a wedding photoshoot. This was for the FStoppers BTS contest and he shot it himself by strapping a GoPro camera to his 5D Mark II.


Behind The Scenes contest video for Fstoppers.com from Jaroslav Repta on Vimeo.


Wednesday, November 30, 2011

Canon T2i shooting at 4000fps?

Ok, so it's not exactly the same as shooting with a Phantom camera. But with the help of Twixtor
it really looks like you can shoot 4000fps with the Canon T2i. Just when I thought about looking for an upgrade to my camera too. I like finding inspirational videos like this.

From David HJ Lindberg

The Beauty of Mud (4000 fps) from David HJ. Lindberg on Vimeo.

Friday, November 18, 2011

where is the Roku remote?

I never realized how dependent I've been on using the Roku for watching TV. Ever since we cut our cable services, that was a savings of about $100 a month. Most of the time we are watching Netflix anyways. I have 16 month old that plays with everything and sometimes things go missing in the house. Last night, I could not find my remote control for the Roku...ugh. I figured I will find it tomorrow or it will appear when I'm not looking for it. But I decided to go online and buy an extra remote. Just my luck it was on sale for $1.99, yes thats it. I ordered two just in case it disappears again. You can buy a Roku for as low as 49.99 now, the new versions even have Angry Birds built in. Tired of cable fees? Cut the cord - get a Roku!


Thursday, November 10, 2011

Church of the Holy Sepulchre

The Church of the Holy Sepulchre is one of the most important pilgrimage destinations since the 4th century. Located in old Jerusalem, this is supposedly built on top of what was once Golgotha, the place where Jesus was crucified, and buried.

This is a insightful video about the church's background and how photographer Gali Tibbon documents the different denominations at this one historical church.


Thursday, October 20, 2011

Getting ready for Halloween photos

Halloween is definitely one of the most popular days for photos. I found these tips from Digital-Photography-School.com for shooting pictures at Halloween.

With Halloween just a few days away I thought it was time to update our Halloween Photography Tips article with some new information and photos.

Photography Tips to Keep in Mind for Halloween

There are plenty of subjects around to photograph at Halloween ranging from the traditional jack-o-lantern through to people in costume, to trick or treat ‘treats’ etc. It’s a time of color, emotion and lots of interesting subjects.

The keys to capturing them are not that different from the normal keys to good composition in photography. As you photograph Halloween this year keep in mind some of the basics of good digital photography. I’ve selected the following tutorials that we’ve written before that should be helpful in your Halloween photography:

Get more tips like this by Subscribing to Digital Photography School

Find Points of Interest

Before hitting the shutter ask yourself ‘what is the focal point (or point of interest) in this image?’ All good images have something in them that holds the attention of those who view them – learn more about focal points and how to enhance them here.

Rule of Thirds

One way of enhancing the composition of your shots is to place your points of interest inn smart positions. While the rule of thirds can be broken with great effect it’s a useful principle to keep in mind.

Fill Your Frame

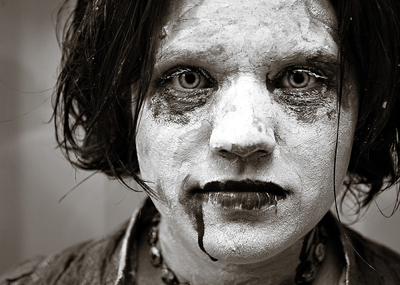
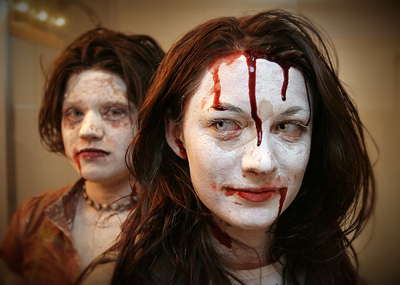
Halloween is a time of drama and you can add to this in your images by getting in nice and close and filling the frame with your subjects. Whether it’s people or objects – getting in nice and tight will usually add punch to your shots.


Give Subjects Space to Look into

When photographing people one of the most effective compositional techniques is to use the space around their faces effectively by giving more room on the side of their face that they’re looking into.

Find Fresh Angles

I suspect that the day after Halloween that photo sharing websites will be filled with images of pumpkins that all look much the same. Make your images stand out by finding fresh perspectives to shoot from.

Photograph the Details

It’s easy to be distracted by the flashy parts of a time like Halloween but it’s often when you step back, take a look around and notice the smaller details that you find the ‘money shots’. Times like Halloween are filled with all kinds of smaller details and photo worthy moments including decorations, carving the pumpkin, people getting dressed in costumes, sleeping kids at the end of parties, bags full of treats at the end of the night, the ‘fangs’ in Aunt Marie’s mouth, before and after shots of parties, close ups of food etc

Group Photos

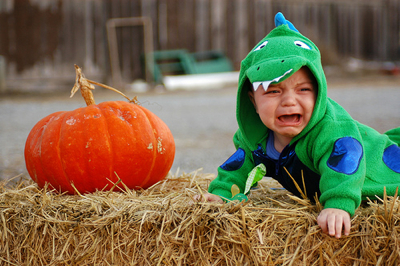
Halloween is a time that people gather together and it’s an ideal time to practice your group photo techniques.

Image by John Althouse Cohen

Candid Photography

Halloween parties are a great time to get your camera out for some candid photos of your friends and family having a great time dressed up in all manner of costumes. Check out these 11 candid photography techniques.

Shooting in Low Light

The type of images that come to mind when I think of Halloween are fairly dark and spooky ones – candles in pumpkins etc. After all, the real action of Halloween seems to happen after dark. As a result you’ll want to think carefully about the light sources for your shots.

To really capture the mood of these situations you’ll want to avoid the stark and bright light of flash photography (or will want to at least pull it back a few stops and diffuse it) and so you’ll need to switch off your flash and do one (or all) of three things to some extent (this is from our exposure triangle series of posts):

  • increase your ISO – the larger your number the more sensitive your image sensor is to light and the darker conditions you can shoot in without having to slow down shutter speed. On the downside you’ll get more grainy/noisey shots.
  • slow down shutter speed – choosing a longer shutter speed lets more light into your camera. On the downside you’ll see any movement in your shots blur (which might add to the spookiness of the image but could also ruin it). Consider using a tripod if you lengthen your shutter speed.
  • use a larger Aperture – this widens the hole in your lens and lets more available light in. It will also lessen the depth of field in your shots. If you have a DSLR with a few different lenses is to use the ‘fastest’ lens you own as it will let you choose larger apertures. For example my f1.4 lens handles low light much better than my f4 lens.

Diffuse Your Flash

Another strategy that I’ve heard of some readers doing at this time of year is diffusing the flash on your camera with colored cellophane to try to lesson its impact upon your shot and also to give the light it produces a glow that might add to your shots – Red might be a good color to try. You’ll probably want to test this before the big night as getting the right density of diffuser will be critical.
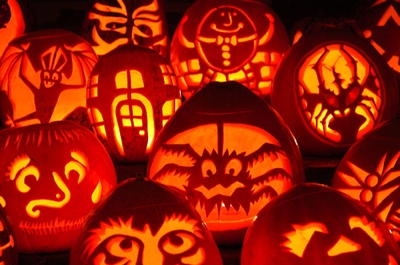
Jack-o-Lanterns

Photographing Jack-o-Lanterns is particularly tricky as to get the full effect of the glowing inside the pumpkin is a bit of a tightrope walk between overexposing and underexposing due to the light and dark patches in the shot you take. Instead of just one candle inside it is probably worth using two or three to give a little extra light. Also take a number of shots at different exposures (exposure bracketing) and you should get one or two that give you the impact you’re after.


Go to Digital-photography-school.com to read more.

Tuesday, October 18, 2011

14fps, shoots longer than 12 minutes, full frame - The new Canon EOS-1D X

Honey, there's a new camera, the Canon 1D X!
My wife actually heard about it before me.

If you haven't already heard, Canon announced the new EOS-1D X slated for release March 2012. Boasting an 18mp full frame censor, 14fps JPEG, 12fps RAW, video capability to record past the 12 minute mark, and wireless networking capabilities. These are just the main points that grabbed my attention right away. There's a full list of other details and a write up on FStoppers.com


Wednesday, October 5, 2011

Photographer Ed Mullholland knows how to take a punch

One of my favorite things to watch is MMA and boxing (actually just Manny Pacquiao fights). Watch this video and get inspired by one of the best fight photographers out there. He also shares some tips on capturing "the shot". Check out Ed Mullholland


Photographer Ed Mulholland Knows How to Take a Punch from PhotoShelter.com on Vimeo.

Wednesday, August 24, 2011

in camera Metering Modes explained

Did you ever take a picture that was over or under exposed even though the meter was at zero (or in the middle)? It was probably because you could have picked a better metering mode for the subject. Or did you even know the differences or how to use the settings?

The folks from SLR Lounge and Lin & Jirsa Photography made this video explaining the different metering modes that your camera has.

Thursday, July 28, 2011

Oh, so that's how you use a monopod.

Thank you to Stillmotion once again for their helpful tutorials. Here is a very informative one on how they are shooting with their monopod (Manfrotto 561 BHDV-1). Another thing to add to my wish list.

deconstructing the story // a monopod tutorial from stillmotion on Vimeo.

Friday, July 1, 2011

Fireworks

Want to learn how to take great photos of fireworks?
It IS fourth of July weekend so I'm sure everyone's going to be out there shooting this weekend.

CreativeLive is putting on another free session today (RIGHT NOW).
http://www.creativelive.com/courses/photographing-fireworks

Monday, June 13, 2011

an inspirational video shot in Kauai

I just got back from a family vaction in Hawaii. I was in the middle of putting together my video and ran across this entry on Planet5D

Imagine going on a hiking adventure exploring Kauai with the homies, sleeping in the Walmart parking lot in your rental car, and all you got is your 5D, 16-35mm, and a glidecam.

This film was made by Devin Graham.
http://devingraham.blogspot.com/2011/01/kauai-lost-world-questions.html


an excerpt from Planet 5D:


This entire film was filmed on the island of Kauai over a 9 day period. The first 3 days were spent hiking the Napali coast, a 11 mile hike along the coast. We did this for 3 days. After this we spent 2 more days exploring the island. I did this with 8 other friends. After the 5 days were up with them, they all flew back to Oahu where everyone was living, and I stayed on the island on my own for 4 more days.

I had a rental truck, that's how I got around. I didn't want to spend money on hotels though, so I slept in the truck, in a Walmart parking lot for the other 4 nights. A lot of cars get broken in on the island of Kauai, according to rumors, so that's why I would camp in the parking lots, so I was a lot more exposed if someone tried to break in where I was sleeping :) That way i wouldn't get robbed, raped, or murdered, ha.

At night when I got done filming, I would go into the only Walmart on the island, where they also have a McDonald's, and I would bum off there wi-fi with my ipod touch, and plot my path for the next day, then I would head out before the break of dawn every morning, and I would get back after sunset to do it all over again.

On a technical side, this was all all shot on the Canon 5D Mark II. Most of the shots were done with the Canon 16-35mm 2.8 L Series lens.

The smooth shots were done with a Glidecam HD-4000. You can check out the exact model on their official website here where you can also buy them. I've been shooting with there glidecams for the last 5 years, and love them. They do take a little bit of a learning curve, but once you get past that, it's all smooth!

Wednesday, June 1, 2011

Why does my exported video look washed out?

That's the google search of the day for me.

I edited some footage last night on Premiere Pro CS5 (windows), exported it using the Youtube Widescreen HD settings. After waiting a few minutes to watch it, I was disappointed to how dull and washed out it looked compared to the screens in Premiere.

The search results got me to Video Copilot's blog, which had a way to adjust gamma-shift settings in Quicktime. This indeed gave me better viewing results. But I'll have to do more tests since I didn't have this problem before.

Here's their tip:

Using mp4 or h.264 when compressing through QuickTime can make the final video look washed out. This is a common problem that seemed to have no solution… until now. The gamma shift can actually be fixed inside QuickTime Pro without re-compressing your video by simply changing a few settings.

Scrimski at CGtalk.com posted a good walk-through. Thanks!

SOLUTION: After rendering into a QuickTime/h.264 file, open it up in QuickTime and select “Show Movie Properties.” Highlight the video track then click on the “Visual Settings” tab. Towards the bottom left you should see “Transparency” with a drop-down box next to it. Select “Blend” from the menu then move the “Transparency Level” slider to 100%. Choose “Straight Alpha” from the same drop-down and close the properties window and finally “Save.”

Wednesday, May 25, 2011

Battle at F-Stop Ridge

Here's a cool video for The Camera Store.

I think it goes really well for my "Nice Shooting" themed blog.

Wednesday, May 11, 2011

Timelapse test 2

It was a really windy and cloudy day this past Sunday and I thought it would be perfect to try to capture some cloud movement. What I ended up capturing was extra movement on the ground too. Rats? Mice?


This was using the T2i's Magic Lantern feature that takes pictures while the mirror is up the whole time. It makes .422 file images, but I don't like the quality.

Wednesday, May 4, 2011

Code Name: GERONIMO

A lot of the photos I like are the ones that capture emotion, candid shots, photojournalistic styles. You just feel the tension, anticipation, excitement in this one. Captured by Pete Souza, White House photographer.

Originally I thought this was a scene as they watched the raid as it unfolded live. But the description on the Flickr page is this:

"President Barack Obama and Vice President Joe Biden, along with members of the national security team, receive an update on the mission against Osama bin Laden in the Situation Room of the White House, May 1, 2011. Seated, from left, are: Brigadier General Marshall B. “Brad” Webb, Assistant Commanding General, Joint Special Operations Command; Deputy National Security Advisor Denis McDonough; Secretary of State Hillary Rodham Clinton; and Secretary of Defense Robert Gates. Standing, from left, are: Admiral Mike Mullen, Chairman of the Joint Chiefs of Staff; National Security Advisor Tom Donilon; Chief of Staff Bill Daley; Tony Binken, National Security Advisor to the Vice President; Audrey Tomason Director for Counterterrorism; John Brennan, Assistant to the President for Homeland Security and Counterterrorism; and Director of National Intelligence James Clapper. Please note: a classified document seen in this photograph has been obscured. (Official White House Photo by Pete Souza)"

Hmmm, I wonder if there's gonna be a new map pack in Black Ops called Geronimo.

P050111PS-0210


Friday, April 29, 2011

Carbon Fiber shoulder rig for $169?

I just ran across this on Ebay. A DSLR shoulder rig, carbon fiber rods, for $169. It's from the same company I got my LCDVF "knock-off" from - Carry Speed. As far as the viewfinder, it's gotten the job done for me. It's a savings of hundreds instead of buying a Zacuto or one of the fancier viewfinders brands.  I had to modify it a bit since the adhesive on the metal plates didn't stick too good.  But that's another story for another post.

This rig looks really tempting, but I'm trying to save money right now. Plus it always seems like there's new gear you want but don't need.

Monday, April 25, 2011

Pacquiao vs Mosley: Fight Camp 360 shot on DSLRs

I just watched episode 2 of Pacquiao vs Mosley 360 (by Showtime) and noticed a couple or DSLRs and RodeMics here and there. There was an obvious scene too where the background was so blurred you knew it was a DSLR, it then cuts to the opposite shot where it's confirmed - camera right on a monopod. I'm not sure if it was entirely shot on DSLRs since there were so many other cameras too. I personally still like HBO's 24/7 storytelling and narration better. But Fight Camp 360 gets me hyped up for this fight nonetheless.

First American Idol, now Manny Pacquiao rocking Dr. Dre's Beats Studio Headphones.
I'll have to put that on my Father's Day wish list.


Thursday, April 7, 2011

T2i audio monitoring and Timelapse with Magic Lantern

I'm sure you know by now that the Canon T2i doesn't have a great internal mic and you can't monitor the audio you record either.  It also has an AGC (audio gain control) that you can't disable, so you can hear some hiss noise during quiet moments when you record.  A solution was either a line in tone fed to the audio and fixed in post.  Or try Magic Lantern.
A few weeks back I decided try the Magic Lantern hack.  It was scary at first, because you're hacking into your camera's internal programs with the risk of making your $899 (now $699) camera into a paperweight.  Well, it was actually easy to install and the more I think of it, you really can't brick your camera because the hack is programmed into your SD card.  Install Magic Lantern on 1 card and if you want to revert, just disable/delete (there's a proper way to) the Magic Lantern files.  Or, insert a SD card without the program and the camera is back to normal.

Updated builds keep coming out, and I have to mention the March 31 build would not work for me when trying to monitor audio through my Rode Videomic.  I found posts from Dave Dugdale and Sven Rose that helped, and after testing out all the builds from March 10-31, I concluded the 29th was the last one with full monitoring capability (at least for me).

There are many ways to set up your camera to monitor audio, some expensive some cheap.  What I'm using is the mini-USB to composite cable that came with the camera, a female RCA to 3.5mm cable, female to female 3.5mm, and some cheap headphones.  I've seen other posts that mention using a mini amplifier for your headphone, but I'm fine with my setup.

Aside from audio monitoring, here are the other NEW capabilities I'm loving with the Magic Lantern hack:
  • AGC disable
  • Timelapse without needing an external intervalometer
  • Timelapse without the shutter going on and off, saving actuations
  • Auto restart after 15 minute record limit (there's a 1 second gap between recordings)
  • Zebras for exposure
  • Auto focus during video recording (works but kinda slow)
  • Change the bitrate settings
...there's a lot more options but I just haven't had time to play with them all.

The best thing about it is that it's FREE.  I suggest you check it out and read all the documentation and watch the videos BEFORE you try to install it.
http://magiclantern.wikia.com/wiki/Magic_Lantern_Firmware_Wiki

Here's a timelapse test using the built-in feature in Magic Lantern. No need for an intervalometer now. Also, these pictures were shot with the mirror up, thus saving actuations on your camera.


Thursday, March 24, 2011

Cobra Crane Backpacker

Do you want those nice cinematic aerial shots but can't afford to buy those big cranes? Or better yet, can't manage to bring big ass crane to a shoot? Vimeo member Alex Guajardo tested out the Cobra Crane Backpacker. This thing can be mounted to any tripod (sturdier the better), and breaks down in minutes to fit in a backpack! You can tilt the camera on the fly. Even get slider-like shots.

I was able to get some shots of Alex with my T2i, as he was shooting his video below.

IMG_9934

IMG_9937

IMG_9931

IMG_9925


Wednesday, March 23, 2011

IndiSlider mini with DIY feet

I just wanted to share my DIY project for adding feet to your IndiSlider mini. First off, this slider is great for only $100. If you want to purchase the version with feet for stable low shots, then it's additional. I ran across a sale on 2 of these mini-tripods for $5 (free shipping) with 1/4" screws that fit perfectly on the bottom on the slider (pre-drilled). Anyway, here's a quick video with the DIY tripod feet to allow for some low shots.

20110322_0003
20110322_0002
20110322_0001


Tuesday, March 22, 2011

Donate to help Japan and win video gear from Philip Bloom

Philip Bloom is once again helping disaster stricken people in their time of need. In the past he has organized relief efforts for Queensland, and New Zealand. This time it's for Japan. You all know how bad it is since the earthquake and tsunami hit on March 11. Make a donation and be eligible to win prizes from Kessler Crane, Zacuto, Cineroid, Marshall, GoPro...and the list goes on.

For details on how to make a donation, visit:
http://philipbloom.net/2011/03/18/please-help-the-japan-earthquake-fund/


Video from Dan Chung:


After watching The Hereafter this weekend...you could just think of what happened to ones trapped in the tsunami.


Thursday, March 10, 2011

Color grading tutorial in Final Cut and with Magic Bullet Looks

Color correcting is easy when you use the presets in Magic Bullet. But I always wanted to make my own or do it without using the presets. Here's a great tutorial on simple changes that make a big difference. One method by using Final Cut's 3-way color corrector and the other method using Magic Bullet.

Wednesday, March 9, 2011

Jason Magbanua shares his same day edit secrets

I shoot mostly weddings.  And when I first started, I was inspired (still am) by internationally acclaimed wedding film maker, Jason Magbanua.  One visit to his website and you'll know why.

Last month he shared his same day edit workflow with the Canon 5D Mk II and Adobe CS5 on a live session from the Philippines.  You can watch this archived event here.

This is the final edit of what he shows us in the live session.

Mary and Guido: SDE from Jason Magbanua on Vimeo.

Friday, March 4, 2011

Free seminar with Vince Laforet: From Stills to Video

 sign up for this free creativeLIVE session and get a chance to win over $9K of gear.


Creative Live Promo from Vincent Laforet on Vimeo.

Thursday, March 3, 2011

Canon prime lenses compared on the 5D

A great video made by GEBBS.TV that compares Canon prime lenses.


Check out gebbs.tv and the video blog for video answers to questions. bit.ly/​igc2NL

Wednesday, March 2, 2011

Vimeo Video School

Learn the basics of DSLR Film Making on Vimeo.  This is a great way to start learning.  Best of all - its Free!

The President's Photographer

Until recently, the only shows I've watched on PBS were the kids shows.  Then, I came across a link to a PBS/National Geographic documentary that takes you behind the scenes with President Obama's photographer, Pete Souza.  What a job.  Imagine all the historical events you're a part of.  This is a motivational video for any photographer. 


Also available on DVD.

Monday, February 28, 2011

Night Photography

This video created by Mark & Angela Walley, is a BTS (behind the scenes) look at a night photography workshop.  It's amazing what you can shoot with slow shutter speeds, flashlights, the night sky, and creativity.  For more information you can check out on-sight.com and thenightskye.com.

Just another beautifuly crafted, inspirational film for photographers and film makers alike.


Night Photography: Finding your way in the dark from Mark & Angela Walley on Vimeo.

Friday, February 25, 2011

The Sartorialist (and making of)

My main focus on getting my Canon T2i was for the purpose of video.  Since then, I've been craving to learn more about photography.


Scott Schuman, aka The Sartorialist, is a fashion director-turned street photographer with a following of about 70,000 readers to his blog.  This video is not only inspiring to me in the sense of photography, but the video itself is a fine example of great DSLR film making.


You can read more about the making of the video here.
This video was shot with a Canon 1D Mark IV.